2008年5月31日 星期六

2008年5月29日 星期四
實驗六:MyEvalVid
1.首先進入本次實驗的資料夾,然後使用ffmpeg程式去對YUV檔案轉成m4v的檔案,如圖 
2.轉成m4v檔案後,接著使用MP4Box檔案將影片在轉成mp4
3.完成後利用mp4trace成是將影片中的每個frame相關資訊擷取出來並存放到附檔名為st的檔案中


2.轉成m4v檔案後,接著使用MP4Box檔案將影片在轉成mp4

3.完成後利用mp4trace成是將影片中的每個frame相關資訊擷取出來並存放到附檔名為st的檔案中


4.接著使用NS2來模擬網路效能

5.接著我們要使用傳送端記錄檔sd、接收端記錄檔rd及影片記錄檔foreman_qcif.st檔案,經由etmp4程式來產生畫面遺失的mp4影片檔,再次使用ffmpeg成是將所得之重建後之mp4檔案回覆成yuv影片檔

6.利用avgpsnr程式去針對重建後的yuv影片檔及原始yuv影片檔,獲得重建後yuv影片的PSNR值

7.最後可用YUVviewer成是來觀看重建後與原始影片的差別,可以看出重建後因為風的有遺失的關係,造成畫面比起原始影片來的更粗糙

2008年5月28日 星期三
2008年5月27日 星期二
2008年5月26日 星期一
如何更改部落格寬度
由於老師有說部落格版面太小,而我也有同感,所以去找了一些資料給大家參考一下。
參考資料:資料來源
部落格的版面物件都是以區塊來定義,整個頁面最外層定義的名稱 (ID) 叫 outer-wrapper,像是整個 Blog 的 container。在 outer 裡面從上到下分成三大塊,分別是 header-wrapper, content-wrapper 和 footer-wrapper。顧名思義,這三塊就是分別用來放最上方的標題列(頁首)、內文以及頁尾。其中表現內文的那一塊 content-wrapper 裡面又分了兩個區塊,ID 分別是 main-wrapper 和 sidebar-wrapper,就是用來顯示 Blog 文章和旁邊 sidebar 的。
底下是部落格區塊的階層關係:
- outer-wrapper
----- header-wrappe
----- content-wrapper
--------- main-wrapper
--------- sidebar-wrapper
----- footer-wrapper
如果要使部落格寬一點,那麼就必須更改部落格每個版面物件的寬度(找到區塊名稱底下的width屬性)。
有一點必須注意的是,不能只更改main-wrapper或是sidebar-wrapper而content-wrapper的寬度沒改,也就是說,每個區塊的大小不能超出它所在的區塊大小。
參考資料:資料來源
部落格的版面物件都是以區塊來定義,整個頁面最外層定義的名稱 (ID) 叫 outer-wrapper,像是整個 Blog 的 container。在 outer 裡面從上到下分成三大塊,分別是 header-wrapper, content-wrapper 和 footer-wrapper。顧名思義,這三塊就是分別用來放最上方的標題列(頁首)、內文以及頁尾。其中表現內文的那一塊 content-wrapper 裡面又分了兩個區塊,ID 分別是 main-wrapper 和 sidebar-wrapper,就是用來顯示 Blog 文章和旁邊 sidebar 的。
底下是部落格區塊的階層關係:
- outer-wrapper
----- header-wrappe
----- content-wrapper
--------- main-wrapper
--------- sidebar-wrapper
----- footer-wrapper
如果要使部落格寬一點,那麼就必須更改部落格每個版面物件的寬度(找到區塊名稱底下的width屬性)。
有一點必須注意的是,不能只更改main-wrapper或是sidebar-wrapper而content-wrapper的寬度沒改,也就是說,每個區塊的大小不能超出它所在的區塊大小。
2008年5月22日 星期四
2008年5月21日 星期三
2008年5月20日 星期二
2008年5月19日 星期一
2008年5月15日 星期四
2008年5月14日 星期三
NS2的擴充方法(一)
以下的資料來自於 NS by Example 第四章
如果需要將自己開發的元件加入NS2應該怎麼做? 這裡將程序RUN一次,並將中間使用到的檔案稍微說明。首先將需要的檔案ex-linkage.cc下載下來使用另一個視窗開啟,在以下的程序可以很快的參考到。
NS2的檔案架構如下圖
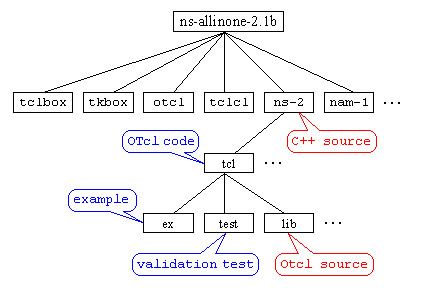
依照這個架構,新寫好的C程式只要放置在ns-2的目錄下即可。在我們的課程裡是ns-2.29 (or ns-2.33)。當然如果為了便於管理你可以開一個子目錄放置自己開發的程式碼。
另外有幾個檔案是比較重要的
如果需要將自己開發的元件加入NS2應該怎麼做? 這裡將程序RUN一次,並將中間使用到的檔案稍微說明。首先將需要的檔案ex-linkage.cc下載下來使用另一個視窗開啟,在以下的程序可以很快的參考到。
NS2的檔案架構如下圖
依照這個架構,新寫好的C程式只要放置在ns-2的目錄下即可。在我們的課程裡是ns-2.29 (or ns-2.33)。當然如果為了便於管理你可以開一個子目錄放置自己開發的程式碼。
另外有幾個檔案是比較重要的
- ns-lib.tcl: The simulator class and most of its member function definitions except for LAN, Web, and Multicast related ones are located here. If you want to know which member functions of the Simulator object class are available and how they work, this is a place to look.
- ns-default.tcl: The default values for configurable parameters for various network components are located here. Since most of network components are implemented in C++, the configurable parameters are actually C++ variables made available to OTcl via an OTcl linkage function, bind(C++_variable_name, OTcl_variable_name). How to make OTcl linkages from C++ code is described in the next section.
- ns-packet.tcl: The packet header format initialization implementation is located here. When you create a new packet header, you should register the header in this file to make the packet header initialization process to include your header into the header stack format and give you the offset of your header in the stack. A new header creating example is shown in "Add New Application and Agent" section.
- other OTcl files: Other OTcl files in this directory, contain OTcl implementation of compound network objects or the front end (control part) of network objects in C++. The FTP application is entirely implemented in OTcl and the source code is located in "ns-source.tcl".
我當然知道英文是有看沒有懂,簡單用中文說一下,在這個範例裡面我們只用到ns-default.tcl,它放在ns/tlc/lib目錄下,它是一個tcl檔,所以裡面用的是otcl的語法,C語言不通。這個檔案放的是你用C語言開發出來的程式的一些變數的初值。基本上每一個變數都需要初值的設定,如果沒有設定在執行ns的時候就會有warning message出現,不過如果你的tcl檔案中在使用變數以前有指定數值那就可以不要管這個warning message。最好每一個變數都在ns-default.tcl中定義初值。另外和Simulator相關的初值設定放在ns-lib.tcl這個檔案裡。對於自己開發的程式,放在哪裡沒有影響。
ns-default.tcl中定義的是otcl的變數初值,我們開發的C語言所使用的變數名稱須要經過link的程序連結到otcl的變數,這點等下會提到。
C物件的開發需要遵循NS2的物件架構,所以在開發的時候先判斷一下所開發的物件應該是繼承哪一個NS2類別。這個範例我們開發一個新的agent類別稱為MyAgent,繼承自Agent類別。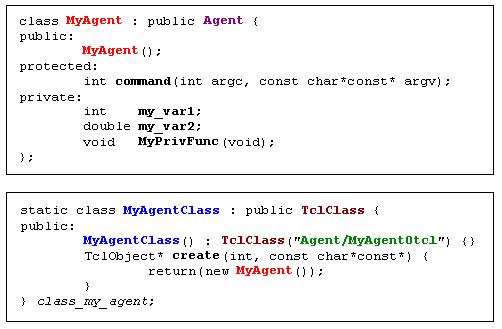
MyAgent類別中宣告了兩個變數(my_var1, my_var2)和一個函式(MyPrivFunc)。另外MyAgentClass是用來當作鏈結類別,連結C類別MyAgent到Otcl類別Agent/MyAgentOtcl。Agent/MyAgentOtcl前面的Agent/指明MyAgentOtcl是Agent下的一個衍生類別。當ns開始執行的時候會建立 class_my_agent物件,此時Agent/MyAgentOtcl類別和其相關的函式就會被建立在OTcl空間中。上面所提到的鏈結類別(static class開頭那段)可以拷貝到你開發的程式碼當中,只要將相對應的類別名稱(有顏色的部分,以及class_my_agent)做修改即可。
變數的連結:
需要在建構子當中將變數的繫結做好。NS2提供四種繫結的方式
- bind(): real or integer variables
- bind_time(): time variable
- bind_bw(): bandwidth variable
- bind_bool(): boolean variable
變數的初值可以設定在/tcl/lib/ns-default.tcl中。
函數的繫結:OTcl command interpreter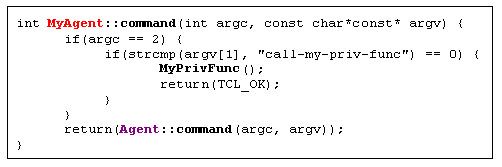
NS2利用command這個函式呼叫來處理C和OTcl間的函式繫結,基本上拷貝後做適當修改貼上即可。上面的程式將C語言中的MyPrivFunc繫結到Otcl上的call-my-priv-func函式。在.tcl程式中使用的時候看起來就像
set myagent [new Agent/MyAgentOtcl]
$myagent call-my-priv-func #這個陳述式會呼叫MyAgent的MyPrivFunc()
Compile, run and test "MyAgent"
- Download "ex-linkage.cc" file, and save it under the "ns-2" directory.
- Open "Makefile", add "ex-linkage.o" at the end of object file list.
- Re-compile NS using the "make" command.
- Download the "ex-linkage.tcl" file that contains "MyAgent" testing OTcl commands. (see Figure 22 for the input script and the result)
- Run the OTcl script using command "ns ex-linkage.tcl".
第二個步驟指示在做連結(link or bind)的時候要加入剛剛開發完成的C程式語言的.obj檔。"Makefile"這個檔案放在ns目錄下(ns-2.29 or ns-2.33),修改完成後執行make重新編譯與連結NS2的核心。.obj檔放置的位置在Makefile檔案中OBJ_CC = \和$(OBJ_STL)陳述句中間。
測試程式和執行的結果如下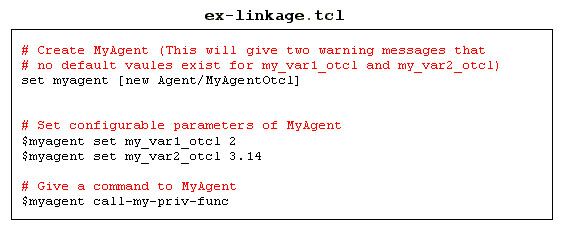
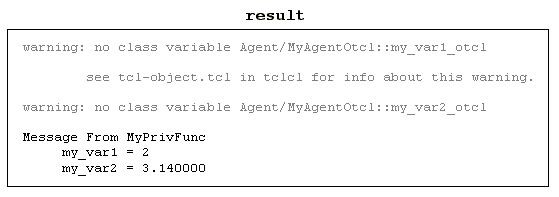
上面的warning message是因為變數的初值沒有事先設定,你可以嘗試設定看看。
另外的例子可以看一下課本實驗四,在實驗中作者加入了mTcpSink和mUDP,mUdpSink等三個類別,光是只學會這裡講的新增Agent還不足以完成實驗四,不過可以先追蹤mTcpSink和mUdpSink的程式撰寫方法,程式碼稍微的追蹤一下應該可以有很大的收穫。
(還有NS2的擴充方法(二)(三),未完待續)
作業:NS2技能的自我檢視
學期過去一半多,該上的好像已經都上過了但是又好像都不會,作為學期成果的檢視,請大家自我檢討一下。我希望每個同學提出五個NS2上的問題,這些問題是你在學習過程當中曾經思考過還沒有答案的,藉由問題的陳述我能夠了解你懂得多少,打分數的時候可以做為參考。這期間如果你發現同學所提的問題是你曾經思考過並且有了答案可以代為回答,這些也可以列為期末打分數的參考。
這裡我舉一個例子,請你們提問的時候要依照下面的範例。
這裡我舉一個例子,請你們提問的時候要依照下面的範例。
- 問題(請限制字數在20字以內):不會自己創立NS2元件
- 描述(字數不限,以能描述問題的情境為主):當我學習到實驗九和實驗十的時候,我希望可以調整一下路由協定的設定以及多收集一些資料(或是過濾掉一些不必要的資料,不必記錄在檔案裡面,因為如果所有資料都記錄會需要很大的儲存空間),這需要改寫C程式。我會寫C程式,也會從現有的程式去改,不過改好以後我沒辦法讓NS2去執行它,需要重新編譯C程式嗎?要用什麼工具編譯?然後要怎樣將C程式和Otcl連結在一起?
2008年5月11日 星期日
2008年5月8日 星期四
2008年5月7日 星期三
2008年5月2日 星期五
訂閱:
文章 (Atom)